1. Home
  2. Knowledge Base
  3. WordPress
  4. DIVI
  5. Snowflakes on your WordPress website with Divi, without plugin

Snowflakes on your WordPress website with Divi, without plugin

Give your WordPress website a magical touch with Divi – without any additional plugins. At Olbricht IT, we show you how to create a charming snowflake effect in a few simple steps. Perfect for highlighting your site during the winter season. Our instructions are uncomplicated and easy to follow, even for beginners. Discover how you can give your website a winter ambience with just a few lines of code. Make your website wintery and festive with us!

1. JavaScript in the code module

Paste the following code somewhere on the page in the code module:

<div id="snow"></div> 

<script> 
document.addEventListener('DOMContentLoaded', function(){ 
    var script = document.createElement('script'); 
    script.src = 'https://cdn.jsdelivr.net/particles.js/2.0.0/particles.min.js'; 
    script.onload = function(){ 
        particlesJS("snow", { 
            "particles": { 
                "number": { 
                    "value": 200, 
                    "density": { 
                        "enable": true, 
                        "value_area": 800 
                    } 
                }, 
                "color": { 
                    "value": "#ffffff" 
                }, 
                "opacity": { 
                    "value": 0.7, 
                    "random": false, 
                    "anim": { 
                        "enable": false 
                    } 
                }, 
                "size": { 
                    "value": 5, 
                    "random": true, 
                    "anim": { 
                        "enable": false 
                    } 
                }, 
                "line_linked": { 
                    "enable": false 
                }, 
                "move": { 
                    "enable": true, 
                    "speed": 5, 
                    "direction": "bottom", 
                    "random": true, 
                    "straight": false, 
                    "out_mode": "out", 
                    "bounce": false, 
                    "attract": { 
                        "enable": true, 
                        "rotateX": 300, 
                        "rotateY": 1200 
                    } 
                } 
            }, 
            "interactivity": { 
                "events": { 
                    "onhover": { 
                        "enable": false 
                    }, 
                    "onclick": { 
                        "enable": false 
                    }, 
                    "resize": false 
                } 
            }, 
            "retina_detect": true 
        }); 
    } 
    document.head.append(script); 
}); 
</script> 
Paste the code into the code module

2. insert CSS code

Insert the following code in the page settings:

#snow { 
    position: fixed; 
    top: 0; 
    left: 0; 
    right: 0; 
    bottom: 0; 
    pointer-events: none; 
    z-index: 1000; 
} 
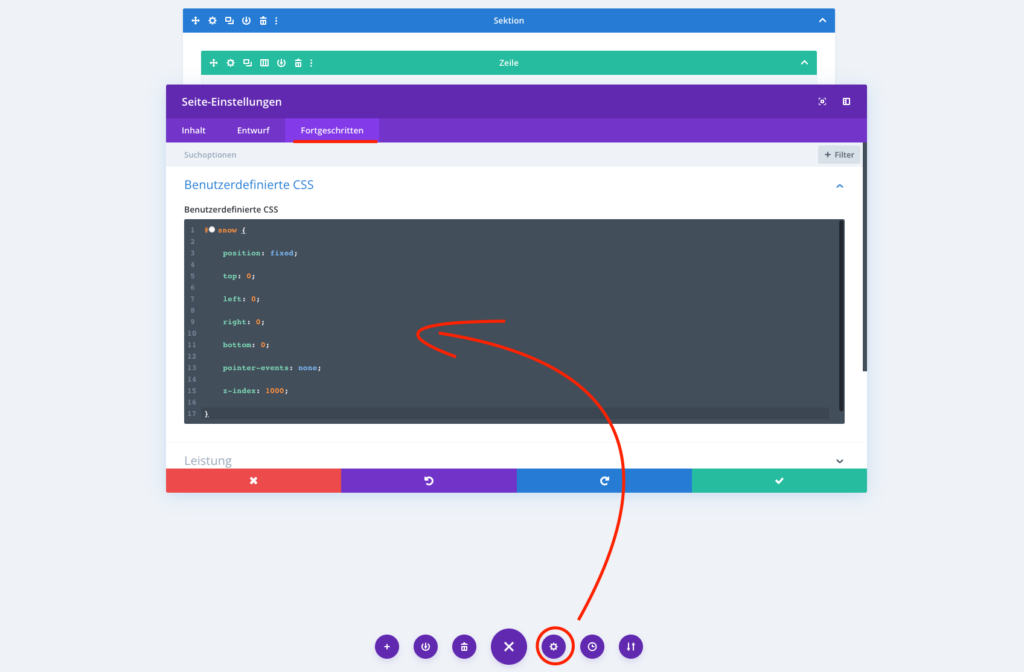
Paste the CSS code under custom CSS

3. the result

You can view the result on this page:
https://noprob.olbricht.it/hier-schneit-es-wordpress-schnee/

It should already be snowing there 🙂

Dieser Beitrag ist auch verfügbar auf: Deutsch (German)

Was this article helpful?

Related Articles

Submit a Comment

Your email address will not be published. Required fields are marked *

Skip to content