When you create a new profile, you virtually recreate the contents of Outlook
Here are the steps required to create a new profile manually:
- Exit Outlook
- Open the Control Panel. The quickest way to do this in Windows 8.x is to press the Windows key+X key combination and select the Control Panel command in the menu that opens. In Windows 10 and older versions of Windows, you can access the Control Panel via the Windows Start menu.
- Double-click the Mail (Windows 10, 7, Vista and XP) or E-Mail (Windows 8.x) icon to open it. In the classic view of the Control Panel, you will easily find the icon in the alphabetical list. If you are using the category view, first switch to the User accounts category; you should then see the Mail or E-Mail icon on the screen.

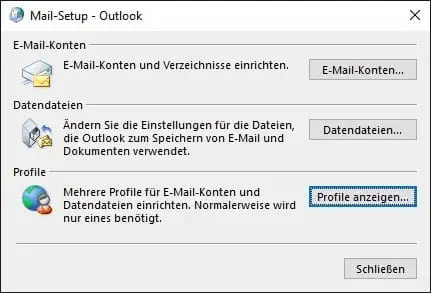
- In the dialog box that then appears, click on the Show profiles button.
- You will now see a list of all available profiles. There is often only one profile called “Outlook”. Click on Add to create a new profile.

- First you need to enter a profile name. The name must be different from the existing profiles. Otherwise you have a free choice. For example, you could use your first name. After entering the new profile name, click Ok.

- The typical Outlook
Outlook stores all the necessary information about your accounts there. More information is available here: https://www.it-business.de/was-ist-eine-pst-datei-a-786612/ do not occur again in the new profile. - After you have finished setting up the first e-mail account with Finish, you will automatically return to the dialog box with the profiles. Here you will find a list entry for the new profile. Click Ok for the time being and then close the Control Panel window.
Now it’s time to add more accounts to your new profile and activate the profile. Many users have several e-mail accounts that they want to access with Outlook
- Exit Outlook
- As described above, open the Control Panel and select the Mail or E-mail icon.
- Select the name of the new profile in the list of profiles set up.

- Click on the Properties button.
- In the dialog box that then appears, click on E-mail accounts.

- In Outlook
- Use this principle to add all the e-mail accounts that you want to manage with Outlook
- At the end, click the Close button repeatedly until you return to the dialog box with the Outlook
You must now ensure that Outlook
- Activate the Always use this profile option in the dialog window with the profiles set up.

- Select the name of the newly created profile in the drop-down field below.
- Click Ok to confirm.
- Close the Control Panel window.
Outlook
Dieser Beitrag ist auch verfügbar auf:
![]() Deutsch (German)
Deutsch (German)


 Skip to content